Spaghetti alla puttanesca - including how to hide your courgette and tomato glut

What glut?

Admit it, you've been growing veg in your garden due to lockdown, hoping that if there was a longer lockdown that you could provide for the family with lots of fresh vegetables. Preserve and freeze any excess, to enjoy through the autumn and winter.

Perhaps you put a couple of courgettes in your garden or in large pots, you may also have planted a few tomatoes too.

These are now beginning to ripen and you may be getting to the point where you need to start hiding the veg in dishes or you get the comment, "not again" when you serve a meal.

We put in 6 courgette plants, each a different variety and have at least 12 tomato plants in a very tiny back garden and they have turned into triffids or even into "Audrey II" from Little Shop of Horrors. The tomatoes are now above the 8-foot poles we put in (7 foot once in the ground). They are heaving with fruit and just starting to ripen.

I'm still needing organic box deliveries, and try as I might to not pick a box with courgettes in it, inevitably the box contents change just after cut-off, so I'm having to get creative.

My daughter and I take it in turns to cook lunch and are normally based around gluten-free pasta, Barilla pasta is great, so is Waitrose, M&S, Sainsbury's. It was my turn today, my daughter's currently working on a sewing project so she's working upstairs. I wait to see if I get a message on my phone whilst cooking with a guess as to what I'm cooking, she is an expert of predicting what I'm cooking from the aromas wafting up the stairs. Today, she was spot on.

Spaghetti alla puttanesca

This is also known as "slut's pasta" there are different variations, this is my "go-to" recipe for a quick lunch and I've always got the ingredients in the store cupboard or fridge.
To understand the history of the dish and why it's got the slang name, Wikipedia explains it's evolution and differences depending on the region.

I put the pan on, ready to cook the pasta, tipped out the rest of the packet of spaghetti into the pan, without properly checking the quantity of pasta. I then discovered that it was not enough for 2, so that's when I decided to add some finely cut courgettes at the end to bulk it out. I couldn't be bothered to get out my spiralizer, so I cut into fine julienne by hand, courgettes cut in this way are known as courgetti.

You can add the courgettes if you have them, but that is extra to either extend the pasta, add extra veg or hide some courgettes and tomatoes.

Ingredients (serves 2)

large pan boiling water
salt
spaghetti for 2

For sauce:

4 tablespoons olive oil
1 small tin anchovies, drained
1 garlic clove, finely chopped
1 tsp dried chilli flakes
2 large tomatoes, diced
2 tbsps capers
3 tbsps black pitted olives, sliced across into 3
Freshly ground black pepper
2 tbsps chopped fresh parsley

1 courgette cut into narrow strips or spiralize it. (Courgetti)

Method

Bring the pan of water to a boil and add the salt, when at a rolling boil, add the spaghetti, stirring to make sure the spaghetti is properly dispersed in the pan.

Put a wide saute pan or frying pan over medium heat, add the olive oil and add the anchovies, crush them with the back of a wooden spoon as they heat and they will melt into the oil. Add the garlic and chilli flakes and fry for one minute. Add the chopped tomatoes and the olives and capers and gently fry until the tomato starts to collapse, season with black pepper. This is now ready, turn off heat until pasta is cooked.

Drain pasta keeping some of the water. Turn back on the heat under the sauce, add the pasta and courgetti (if you are using this) to the sauce and toss well, add a splash of the cooking water to the pan to loosen the sauce, sprinkle over the parsley. Toss together for another minute, the courgetti should have started to wilt slightly, it is now ready to serve.

Enjoy

Share:

Chopping an onion - the easy way with no tears


Preventing the tears

So many people end up with streaming eyes when they chop an onion. There are many ways to stop the tears, perhaps by putting a spoon in your mouth, wearing sunglasses, even a facemask and snorkel.

If you follow my simple method, you should find that you get a lovely pile of chopped onion, without the pain.

This is how you achieve diced or "fine diced" onion.

Tip - Freeze for later

I've also discovered that once diced, you can pop the onion in a freezer bag, flatten out the bag, to try and break the pieces up and pop it laid flat in the freezer. Once frozen, you can then shake the bag and you have "ready diced" onion to use.

At school, my teacher, Mrs Passmore, taught us a different way to chop an onion.

Golden rule - DO NOT CUT OFF THE ROOT.


Start with your onion cut in half, keep the cut side down on the board.  Now peel your onion, slicing it in half first helps you to peel off the outer covering, but keep the cut root on the board.

Make sure the root is left on (if you cut it off the sulphuric acid in the root end will make you cry).

The tear making section is the part of the onion closest to the root.
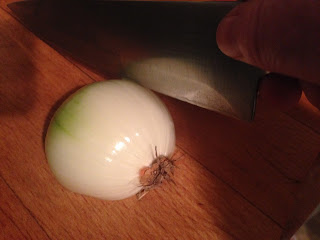
Hold your knife so that you cut down onto the board at an angle, so that when you get nearly through the onion, you don't cut through the root.

The onion is placed on the board, with the root closest to the knife. 

If you are right-handed, start at the far right when slicing. 

If left-handed start at the far left.

Notice how the knife isn't cutting through the root, it's stopping just above where the root is.

Keep slicing, moving carefully closer each time you slice.

You can use the segment marks to help you.

Continue cutting from right to left (if right-handed) reverse if left-handed, until you've cut through all of the onion.
Now turn the onion 90 degrees, so that you can now slice across, cutting into small dice.

Notice how the root is still attached and the onion is still in one piece.

You can now see that you have one chopped onion.

Carefully dispose of the root into your veg waste, keeping that root away from your eyes.

Do remember not to touch your eyes with your lovely oniony fingers, or you will transfer some of that sulphuric acid and will get tears.

I hope you find this helps when preparing your meals.

Let me know if it works for you.

Share:

Turkey chilli

Our easy Turkey Chilli recipe.

When we dropped red meat from our diet, one of the dishes we thought we would miss the most was Chilli con Carne, but through experimentation, we have created a great Turkey chilli and prefer this over a normal chilli, plus it's really easy to make. This is a great low-fat, heart-healthy meal.

Adding beans to the chilli extends the dish, we love black beans, kidney beans and also cannellini beans. It's a way of changing the dish. It also means you have leftovers for another day. Great on the top of a jacket potato or with some tortilla chips, guacamole, salsa and sour cream.

Sometimes I will add a chopped green or red pepper when I'm frying the onions. You could also add 1/2 tsp cayenne pepper and 1 chopped fresh chilli instead.

Ingredients

2 tablespoons olive oil
1 white or red onion, finely chopped
1 tablespoon paprika
1 level teaspoon cayenne pepper (this is medium spice)
1 teaspoon of mild smoked paprika

Turkey thigh mince
1 tin chopped tomatoes
1 Knorr beef stock pot 
1 tsp Tamari soy sauce
optional tin of black beans/kidney beans
optional 1 green/red pepper chopped
salt and pepper

Method

Over medium heat, sweat the onion in the olive oil until soft, add a small amount of water to the pan before adding the spices, this stops them burning. Gently fry off the onion and spices until the water has evaporated, keep stirring. If you are going to add the green pepper, add it now and fry 1 minute.

Add the turkey mince and fry off until browned.
Add the tin of tomatoes and a beef stockpot, you can also add a tin of black or kidney beans (don't drain them). If you didn't add the beans, then add half a can of water (wash out the rest of the tinned tomatoes). Stir in the Tamari (this gives a deeper flavour).

Cook gently for about 25 minutes, check the seasoning.

If you are using this in taco shells or with tortillas, cook down a little more, so that it is firm.

Serve with rice.

We also like some salsa and guacamole with ours. A pot of chopped fresh chillies, so that you can sprinkle over as much heat as you want. 

If you aren't worried about the fat content, some grated cheddar and sour cream is a perfect topping.
Share:

Oven Baked - Southern Fried Chicken (gluten free)

Oven Baked - Southern Fried Chicken

Trying to get southern fried chicken that isn't deep-fried and is gluten-free is impossible unless you make it yourself. I've created the following recipe and it is so easy to make and much better than a well known fast food. You cannot tell that this is gluten-free, we serve to all of the family, saving you time.

You can use normal flour if you aren't on a gluten-free diet or butter if not on a lactose-free diet. 

I have now discovered that a spray oil works really well and the taste is great.

I've been tweaking the recipe over the last year and this is my revised recipe.

Ingredients

3 legs of chicken - cut into thighs and drumsticks (we now buy a pack of free range thighs and drumsticks from Tescos), so that's why I now use 2 eggs.
spray oil
2 eggs

Coating
4 oz plain or self-raising gluten-free flour
2 oz white cornmeal (if you don't have this, increase flour above to 6 oz).
Spices as follows - (see picture for spices I use)
1 tsp paprika
1/2 tsp cayenne pepper
1 tsp dried sage
1 tsp dried thyme
1 tsp dried oregano
1/4 tsp ground mace
1/4 tsp ground allspice
1/4 tsp ground cinnamon
1/2 tsp garlic pepper
1/2 tsp onion salt
1/2 tsp garlic salt or granules


Method

Preheat oven to Gas 6. 


I use an 11-inch roasting tray, it needs sides to capture the juices and oils as they are released. I use a parchment liner (these are available from Lakeland precut and save so much time).
Grease the tray with the spray oil, this is the simplest way to grease and allows you to spray the chicken easily once coated.
Mix all the coating ingredients in a zip lock large bag, zip closed and then shake to mix.
Dip and coat a piece of chicken in the beaten egg, then drop the chicken in the zip bag and coat with the seasoned flour, keep moving until all of the chicken is coated. 

Place the chicken evenly onto the roasting tray, place the thighs with the skin side down, this makes a great crispy skin and coat the remaining pieces of chicken in the same way.

Lightly spray the chicken with the oil.


Put in the oven on the middle shelf and bake for 20 minutes, turning over half-way through, give another light spray with the oil and continue baking.
At the point when I turn the chicken, I normally pop in a tray of oven chips on the top shelf, or some sweet potato wedges.
Bake for another 20 minutes, total cooking time is about 40 minutes. 

Check the chicken is cooked by piercing the chicken thigh with a sharp knife, check that the chicken isn't pink. If pink, return to the oven for another 5 minutes. Always check the chicken before serving.

The wing joints are also great especially if you joint your own chicken.
To make chicken nuggets, use breast meat cut into chunks, they will cook quicker.

We've also coated some button mushrooms in the same way and baked using this method, really yummy.

Serve with chips and some homemade coleslaw or my salsa.
Share:

Guacamole

Guacamole

This is a great side dish to Chilli con Carne or our Turkey chilli and also with tortillas. It's a dip in it's own right, so perfect for a snack.
Add as much chilli as you are comfortable with.

We make a variation of this called Guacasalsa, which means we make the Tomato salsa and then add chopped avocado to it, all in together.

Ingredients
1 avocado
1/2 small onion (finely diced)
1/2 green chilli (finely diced)
1 tomato (finely chopped)
Juice from 1/2 lime
Salt & Pepper

Method
Mash the avocado, squeeze over the lime juice and mix, this prevents the avocado from going brown. Then add the other ingredients and stir. 
Season to taste
Share:

Salsa


This is a very simple Tomato salsa

This is great with my Turkey chilli or a Chilli con Carne and rice, or on the side when serving with tortillas. I also love serving this with my southern fried chicken. Add as much chilli as you are comfortable with, this is a mild salsa. I tend to make this, serve it to those that like it mild, then mix in more chilli and serve to those that like it hotter.

Ingredients
3 Tomatoes (finely chopped)
1/2 small red onion (finely diced)
1/2 green chilli (finely diced)
Juice from 1/2 lime
Salt & Pepper

Method
Mix together and serve, season to taste.
Share:

Fennel and Lemon Risotto

Fennel and lemon slices
Fennel and Lemon Risotto is a treat either for lunch or as an accompaniment to dinner.

A Riverford organic vegetable box is a great way to increase the variety of vegetables you eat, stopping you getting into a rut. This week I received 2 bulbs of fennel. 
Now here's the quandary, I don't like aniseed or liquorice, but actually like the flavour of fennel and tarragon when it's very mild. 
So what were my choices? There is the classic fennel and orange salad, Delia's roasted red peppers with fennel (which are lush hot or cold and my husband's favourite) but I didn't have any peppers; a layered potato and fennel gratin or something different!
Jamie Oliver has a great video about fennel, explaining the nutrients too. I love to see buddy just eating the slices raw and chewing the fronds (bubblegum style).
I decided to get creative and make a fennel and lemon risotto and was very pleased with the results. The flavour was very subtle, creamy and was great with some turkey burgers.
I still have another bulb of fennel left to use.

Ingredients (serves 4 as an accompaniment)

1 onion, finely chopped (check out my tutorial on chopping an onion with minimal tears)
1 bulb of fennel
1 tbsp olive oil
25g unsalted butter
1/2 packet risotto rice
1 Knorr chicken stock pot (you could use vegetable stock)
1 large lemon
25g grated parmesan
25g unsalted butter (to add at the end)
salt and pepper

Method

Scrub the lemon under some hot water to remove any wax or product and leave to dry.

Now to prepare the fennel. I trimmed off the top of the fennel, the stalks were a bit tougher. I then cut the fennel in half, then into quarters and remove the core if necessary. I then chopped the fennel into small piece, slicing down the length, then across.

In a small saucepan, pop in the stockpot and 500 ml boiling water. Dissolve the stockpot and then leave over low heat, just keeping it hot. You always add boiling stock to a risotto.

Take a large saucepan, add the olive oil and 25g of butter, melt over medium heat, then add the chopped onion and fennel and fry gently for about 5 minutes until the onion is going translucent.

Add the rice and stir, frying for another minute, the rice should start to squeak. If you haven't made risotto before Gennaro has a great video teaching you the basics.
Start adding the stock, 2 ladles at a time, stirring and cooking until the risotto rice is just cooked, top up the stock pan if you need more water. Add the grated zest of the lemon, stir well, then season with salt and pepper.

Remove from the heat and add the parmesan and butter and stir again. Cover and leave for 3 minutes.

Serve and grate over a little more lemon zest.

Let me know if you try this, or have any other great ideas for using fennel. 


Share:

Scallops with wild garlic and pasta

Organic Boxes

We are now into the 4th week of lockdown due to COVID-19 and we are very fortunate that we have had an organic box delivery for over 20 years. Initially, we used to collect our box from a local distribution point, then moved to Riverford, last year I set up an Abel & Cole organic box delivery as an alternative.

One weakness of many food delivery companies is that you can't have more than one address attached to your account, therefore I set up one account for my elderly parents with Riverford and another to be delivered to my workplace.

When there started to be an issue getting produce, just before lockdown, I tried to move my Riverford delivery from my work address back to my home address, but it could not be changed due to capacity issues.  I was able to organise a weekly Riverford delivery of veg, meat and milk to my parents. Fortunately, I was quick enough using Abel and Cole to set up a regular weekly delivery and the bonus is that I can still add to the order if I need to and they have a wider variety of produce available. I don't know what will arrive in my veg and fruit box though, therefore every week is a mystery.

During lockdown, it's easy to get into a food rut, so it's important to experiment with new recipes to keep the palate fresh.

What to cook for lunch?

I still had some wild garlic in my fridge and some fresh scallops from my delivery this week. What to cook? After some research at other recipes, I created the following recipe.

Ingredients (serves 2)

Linguini pasta
1 shallot finely chopped
50 g butter
2 tbsps olive oil
1 handful of chopped wild garlic
1 garlic clove, finely grated
1 tsp dried chilli flakes
125ml white wine or vermouth
grated zest lemon
6 scallops
salt and pepper

Method

Put the pasta into cook, make sure you salt the water.

In a medium saucepan, add 1 tablespoon of olive oil and 25 g butter over a medium heat and add shallots, cook gently until soft. Add the chilli flakes, garlic and wild garlic and fry gently for 2 mins, add the white wine or vermouth and gently cook until reduced by half, season.

In a frying pan heat the 1 tbsp olive oil over a medium heat.. Wash and pat dry the scallops, season with salt and pepper. Fry scallops - don't move them around, wait 2 minutes until golden brown. Turn scallops onto other side and continue frying. Add the butter to the pan, and spoon the butter over the scallops.

When pasta is cooked, drain and add to the medium saucepan, toss with the garlic & shallot mixture. Add some freshly grated lemon rind and toss. Serve in a pasta bowl with more grated lemon rind and serve the scallops on the top.


Share:

Isolation popcorn (butterscotch) - caramel popcorn recipe


Isolation popcorn - perfect for those movie afternoons.

There's nothing like the smell of hot popcorn, it's so quick and easy to make and great if you are going to sit down to watch a film or stream a live show.

It's the snacks that people will be missing during the Covid-19 outbreak, so this a perfect treat and only needs minimal ingredients. I add a large pinch of Maldon sea salt to the butterscotch as I'm making it, then you get a lovely salted caramel flavour.

If you love the popcorn that comes in bags, with a caramel/butterscotch crispness, then you will love this easy recipe.

Ingredients

For the popcorn:

1 heaped tbsp popping corn
1 tbsp cooking oil

For the butterscotch:

25g butter
25g golden granulated sugar
1 heaped tbsp golden syrup

Method

First pop the corn. If you have an electronic popper then use that (it dry pops the corn so no oil and very healthy).

Stove top method:

You need a large deep heavy-based pan with a lid to pop the corn.
Heat the oil in the pan over medium heat, add the popping corn stir, then cover with the lid. 
Gently shake the pan and you will soon hear popping start, keep gently shaking whilst holding the lid on the pan (you don't want popcorn snow in your kitchen), until the popping slows down. 
Don't leave too long, or the popcorn could burn. 
Take off the heat and remove the lid after 10 seconds (you hopefully won't have any more pops. 
Pour into a large mixing bowl. 
Check through the popcorn and remove any unpopped kernels.

Take a medium pan, add the butter, sugar and golden syrup and start to heat over medium heat. You can stir with a wooden spoon. It will get very hot, so be careful if you have young children around, this part is best done without them around. It will bubble and foam, keep cooking until it starts to turn colour, you need to keep stirring and watching it carefully at this stage, it will colour very quickly. 
When it has turned a lovely butterscotch colour, turn off the heat and drizzle over the popcorn in the mixing bowl. 
Use 2 wooden spoons, or serving spoons to toss the popcorn with the butterscotch. It will get very sticky and you may start to see spun sugar threads. Keep tossing the popcorn, so it doesn't stick into one huge mass.
As soon as cool enough to handle, you can start to break up the pieces.

If you want to make salted caramel, add a large pinch of flaked sea salt crystals to the butterscotch whilst you are making it.

Sit back and enjoy your film.

If you have any other flavours that you make, I'd love to hear your ideas.

I have discovered an amazing gluten-free popcorn available to pop at home on Amazon. It produces mushroom-style kernels like a well-known brand you can purchase in bags covered in butterscotch😉


Share:

Turkey meatballs in tomato and basil sauce


Finished photo of meatballs with linguini
As we eat mainly turkey, chicken and fish, I'm always trying to think of different ways to use a pack of turkey mince.
It's easy to become stuck in a rut and keep making turkey chilli, so tonight I was determined to make a different evening meal. This is quick, simple and easy to make.

Serves 3-4

Ingredients

For the tomato sauce:-
1 tablespoon olive oil
1 white onion, finely chopped
Pinch salt
1 clove garlic, finely chopped 
1 teaspoon dried oregano
1 tin chopped tomatoes 
1 pot (70g) tomato purée (cirio do perfect sized portions)
1/2 teaspoon sugar
1/2 teaspoon balsamic vinegar
1 tablespoon fresh basil

For the meatballs:-
2 tablespoons olive oil
1 white onion, finely chopped
Pinch salt and pepper
1/2 teaspoon dried oregano
1 tablespoon tomato ketchup
500g turkey thigh mince

Pack of linguini or spaghetti (check measures on side of the packet and cook amount for the appropriate number of people.)

Method

Start by making the meatballs

Using a medium bowl, add all of the ingredients for the meatballs. Mix all the ingredients together well, using a wooden spoon or your hand whichever you prefer.
Prepare a tray for your meatballs to sit on ready to fry, place a sheet of parchment paper on the tray to make them easier to transfer.
Shape the meatballs in your hands, golf ball-sized is ideal, they can be popped in the fridge if you want to make them in advance.

Make the tomato sauce

Heat a medium saucepan over medium heat. Add 1 tablespoon of olive oil to the pan and fry the onions and pinch of salt gently until softened, about 5 minutes. Add the garlic and oregano and fry gently for another 2 minutes. Add the tinned tomatoes, tomato puree, pepper, sugar and balsamic vinegar and simmer gently for about 5 minutes, add the fresh basil. 
You can also use this tomato sauce as a base for a pizza or with pasta. 

Combining the meatballs with sauce

Heat a saute pan over medium heat, add 2 tablespoons of olive oil and fry the meatballs until browned on all sides. Be careful when you turn them, or they could break up, the trick is to leave them for about 1 minute before trying to turn them.
When they have browned all over, add the tomato sauce and enough water to cover the meatballs, stir carefully. Bring to a boil and then turn down to a simmer. Turning occasionally.

Cook the pasta according to the instructions on the packet.


Serve with fresh basil and parmesan to taste.


Share:

Instant Pot DUO EVO Plus

Popular Posts

Powered by Blogger.

Contact Form

Name

Email *

Message *

Labels

Abel & Cole (2) allspice (1) anchovies (2) apple (3) aubergine (2) avocado (3) bacon (5) basil (5) basmati rice (1) bay leaves (3) beef (4) beef stock pot (2) beetroot (3) black beans (1) black olives (2) bouquet garni (1) breadcrumbs (2) broccoli (1) bulghar wheat (1) butter (5) butternut squash (2) cabbage (1) capers (4) caraway (2) carrot (11) cashews (1) cauliflower (3) cayenne pepper (2) celery (7) cheese (4) cheese sauce (1) cherry tomato (1) chestnut mushrooms (3) chestnuts (3) chicken (19) chicken stock pot (3) chilli (6) chilli powder (1) chopping an onion (2) chorizo (4) Christmas (4) cider vinegar (2) cime di rapa (1) coconut milk (1) coriander (2) cornflour (1) courgette (6) cranberries (3) cream (1) crevettes (1) cucumber (5) cumin (1) dairy free (4) Danestream (1) dates (1) Dijon mustard (3) double cream (3) egg (11) faggots (1) Farmhouse on Boone (1) fennel (1) fermented foods (1) Ferndene (1) feta (1) french beans (2) frozen peas (2) gardening (1) garlic (27) geocaching (2) ginger (4) gluten free (8) golden beetroot (1) golden syrup (1) goose (2) GPS (1) gravadlax (1) greek yoghurt (1) green chilli (2) green pepper (5) Guinea fowl (1) haggis (1) Hairy Bikers (1) Hake (1) halloumi (1) Happy Kombucha (1) hiking boots (1) icing sugar (1) Instant Pot (2) jacket potato (1) jerusalem artichoke dauphinois (1) juice recipe (2) kidney (1) kidney beans (1) Kimchi (1) lactose free (1) lamb (4) lasagne (1) leek (3) lemon (11) lemon juice (1) lemons (1) lentil soup (1) lentils (1) lime (3) linguine (1) liver rescue (1) marrow (1) medical medium (1) milk (6) minced beef (2) mixed herbs (2) mushroom (5) mushrooms (9) Nando’s (1) New Year Plans (1) nutmeg (2) olive oil (10) onion (37) orange (2) oregano (6) organic (3) organic box (2) ox cheek (3) oxtail soup (1) paella rice (1) pancetta (5) paprika (5) parmesan (6) parsley (15) parsley sauce (1) parsnip (1) parsnip soup (1) passata (1) pasta (6) pear (1) peas (3) pepper (5) peppers (2) pesto (1) pitta bread (1) popcorn (1) porcini (2) pork (1) port (1) potato (8) prawns (2) preserving (1) quinoa (1) quorn (1) raspberries (1) red cabbage (1) red lentils (1) red onion (6) red onions (5) red pepper (5) red wine (4) rice (7) ricotta (1) risotto rice (3) Riverford (11) rosemary (2) saffron (1) salad (2) salmon (1) salsa (1) salt (2) sauerkraut (1) sausagemeat (1) sausages (1) scallops (2) sesame paste (1) seville oranges (1) shallots (4) slow cooker (1) smoked paprika (1) soup (3) sour cream (1) sourdough (1) Sous Chef (1) soy sauce (1) spaghetti (3) spinach (3) Spring onion (2) spring onions (2) squid (1) steak (1) suet (1) sugar (2) sweet potato (2) sweetcorn (1) swiss chard (1) tahini (1) tamari (1) thai fish sauce (1) thai green curry paste (1) thyme (7) tomato (25) tomato puree (4) tomatoes (13) tortilla (1) tuna (3) turkey (12) turmeric (1) veal (1) vegetables (2) vegetarian (2) watercress (2) watercress soup (1) white cabbage (1) white sauce (2) white wiine (1) white wine (1) wild garlic (1) worcester sauce (1) yellow pepper (1) yoghurt (1)